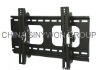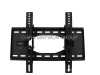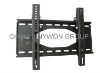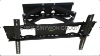

SY233 Swivel Mounts TV Bracket 1) Swivel: -45 to +45 degree";Tilt adjustable:-15 to +15 degree 2) Size (inch):
SY233 Swivel Mounts TV Bracket
Features: 1) Swivel: -45 to +45 degree";Tilt adjustable:-15 to +15 degree 2) Size (inch):a)21"--37";b)32"--56";c)36"--63"; 3)Loading (kg):(a)50;b)70;c)75;4)Including a precision bubble of level to assure proper mounting angle5)Fits most large flat panel plasma and LCD TVs,Safe and easy to install6) All hardware included7) Surface: polyester powder coating (black or light grey)Long lasting8) Material:armor plate or gauge cold steel construction 9) Extension arm extends TV from 112mm to 498mm off wall10) User manual included11) Compliant to VESA standard12) Packaging: Colour box, Plain white box or common brown box
Our products include LED/LCD/Plasma TV Mounts, TV brackets, CRT TV brackets, speaker stands, microphone stands and other hardware products. Customers' samples and designs are also accepted.
TV Mounting Bracket Installation Instruction
Installing a TV wall mount is a project most people can do themselves with a few common tools. As you work on your project, be sure to follow the manufacturer‘s instructions that come with your bracket and television.
NOTE: Do not wall mount your TV if your house has metal studs—most metal studs will not support the weight of a television.
Step One
Attach the TV Mounting Bracket to the Television
1. If there’s a stand on the TV’s frame, unbolt and remove it.
2. Locate the mounting holes on the back of your TV. If necessary, pry off the plastic caps over the holes with a screwdriver.
3. Attach the mounting arms to the mounting holes on your TV, using the bolts provided with your mounting kit. Be careful not to over tighten, and do not use a power drill. Make sure the two mounting brackets are level with each other.
4. Set the TV aside. Be sure to rest the TV so the screen is facing upward. Setting the TV with the screen facing down can cause permanent damage.
Step Two: Identify TV Placement
Determine the best wall location for mounting the television.
• Look for a location with no glare, and good visibility from all sitting areas in the room.
• For maximum viewing comfort, plan to mount your TV at a height on the wall that corresponds to the viewer’s eye level when seated—typically, with the center of the screen located 40–45 in. off the floor.
• Choose a location close to an electrical outlet. Measure the length of the TV’s power cord to be sure it will reach.
Step Three: Attach the TV Wall Mount Bracket to the Wall
NOTE: Do not use hollow-wall anchors as they cannot support TV wall mounts.
1. Use a stud finder to locate the two studs in your wall that will support your TV.
2. Mark the location of each stud’s center with a pencil. Use a nail to confirm a stud has been located.
3. Measure the distance between the top and bottom holes on each TV mounting arm. Mark two points in the center of each wall stud, corresponding to these holes. Use a level to ensure the mounting holes for each arm are even.
4. Use a power drill to drill pilot holes for the wall bracket screws or bolts.
5. Attach the wall bracket plate to the wall using the screws or bolts provided with the wall mount kit. If the kit uses lag bolts, drive them in with a socket wrench.
Step Four: Connect the Cables
NOTE: If you’re attaching your TV flat to the wall to a fixed wall mount, you may find it easier to connect the cables to the television before attaching it to the wall bracket.
1. Be sure the TV and any attached devices are unplugged.
2. Have someone help you hold the television up to the wall mount. Attach the audio and video cables to the television per the manufacturers’ instructions.
Step Five: Hang the TV
DO NOT ATTEMPT THIS ALONE. Have one person interlock the brackets while one or two others lift the TV.
1. Lock the TV mounting arms onto the wall bracket plate. Follow the manufacturer’s instructions to secure the connections.
2. Confirm that every point of connection is locked down securely. Test your installation with a few light tugs.
3. Test and troubleshoot connections and TV functions to be sure they all work. Make adjustments as necessary. Be sure to get help if you need to remove the TV from the wall.
More Product Show
Factory Show
Packing & Loading
Quality Certification
Project Show
Please call me for any further question you may have: 0086-13959252067
Glad to receive your inquiry soon!
SY233 Swivel Mounts TV Bracket