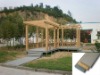

pvc vinyl floor plank,plastic plank Perfect for interior and exterior use Moisture Resistant, Maintenance Free
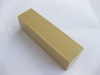
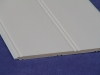
Vinyl Planking/Wainscot
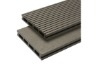
Size: 180mm x 6mm
It is made from high-strength PVC composite. It prevents warping, corrosion, rotting and mold or mildew builds up. Since this product is prefinished in white, it does not require any painting. However, if you would like to have it in a different color, you can also paint it. For painting, wipe thoroughly with water or an appropriate cleaner to clean any dust or residue from the surface. Primer is needed. Allow it to dry completely before applying paint.
Installation Instructions:
General – For better holding strength, angle all nails. Drive nails within ¼” of the surface with hammer, then finish with a nail set. For easier installation, use Liquid Nails or a similar quality panel adhesive. Tap the board into place with a hammer and a wood block to protect the planking. For a better square fit, slightly angle the tongue of the planking to the groove. Due to mild expansion and contraction, do not press them against each other too tightly.
Prerequisites
– The tools needed for installation are: a fine tooth saw, 1” finishing nails, hammer, nail set, ruler, level, carpenter’s combination square and panel adhesive such as Liquid Nails.
Base Trim
- Measure the correct length and then cut for an accurate fit on the wall. Saw into the surface for a cleaner edge. Apply Liquid Nails or a similar panel adhesive in a zigzag pattern before installing.
- Apply the panel to the wall making sure the base trim piece has the pre-grooved end up. For additional strength, also use nails. Fill in any gaps with caulk or wood putty. Check to see if trim pieces are correctly aligned.
Planking/Wainscot
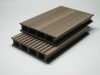
– Insert each piece into the groove of the base trim and secure it by either nailing or gluing it to the wall. Begin at an inside corner and work left to right if you are right-handed and right to left if you are left-handed. Each piece is tongued and grooved for a better fit and simple application. Keep the groove edge toward the starting corner, and the tongue edges toward your work direction. Nailing top, bottom and every 16" to 32" will insure adhesive contact to the boards. Allow space between planking for expansion and contraction. Measure and fit the next boards carefully. The last board may have to be trimmed to fit into a corner.
Chair Rail
– To complete the job, make sure all planks have been applied to the base trim correctly. Then apply the chair rail on top of the planks after measuring for the correct length. The chair rail is pre-grooved at the bottom fitting over the planks.
– For easier installation, use Liquid Nails or similar quality panel adhesive before applying. Check to see if rail pieces are correctly aligned. For additional strength, use hammer to strike 1” finishing nail into the thinnest part of the chair rail.
– Make sure to drive nails within ¼” of the surface with hammer, then finish with a nail set. This is to avoid damaging the rail’s surface.
– Fill in any gaps with caulk or wood putty after hammering in nails.
Maintenance
– Cleaning your planking with a damp cloth usually leaves it looking like new. If the product has been painted, make sure to follow the manufacturer’s instructions for the maintenance of finish.
PVC Planking