
.Waterproof and rechargeable receive collar .Audible wire-break alarm .10 seconds safety stimulation
Main Feature:
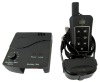
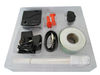
Beep warning with 4 levels of shock correctionWaterproof receive collarAudible wire-break alarm100M wire , 50 PCS flags and 2 Adaptors includedRechargeable receive collar (rechargeable 3.7V Li-ion battery)Strong TPU strap for receive collarLED low power indication, red light flash when battery level is low.10 seconds safety stimulation . Receive collar stop shock automatically when pets get stuck in correction zone more than 10 seconds .2-hour charging2-year warranty, CE & Rohs CertifiedSelective contact points to match the dog’s coat typeSETTING UP AN IN-GROUND FENCE SYSTEM
Please follow up these steps to set up an in-ground fence system:
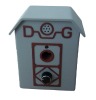
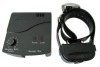
I. Locate the Fence Transmitter: Install the Fence Transmitter in buildings . Place the Fence Transmitter at a dry area where temperature not fall bellow freezing and at least 3 feet from appliances.
II. Layout the system and position the boundary wire: Design a Boundary Wire layout that is suitable for your yard .The Boundary Wire must start at the Fence Transmitter and make a continuous loop back .
Note: Running the Boundary Wire parallel to and within 5 feet of electrical wires ,neighboring containment system, telephone wires , television or antenna cables ,or satellite dishes will cause an inconsistent signal. If you must cross any of these , do so at 90-degree angels.
III. Connect the boundary wire to the Fence Transmitter: Strip the ends of the Boundary Wire and insert into the Boundary Wire Terminals of Fence Transmitter to make a complete loop . Plug the Power Adaptor into the Power Jack of Fence Transmitter and AC power supply outlet .
Note : If the Boundary Wire connection OK , The Loop Indicator Light will be on after plug power supply . Otherwise , Fence Transmitter beep warning .
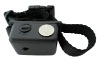
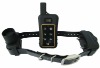
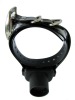
IV. Prepare the receive collar: Your Receive Collar comes with short Contact Points installed . Use the long Contact Points for pets with long or thick hair . Press the On/Off button of Receive Collar , Receive Collar is power on .
V. Set the boundary width and test the receive collar: Rotate the knob of the Boundary Width Control Switch to adjust the width of the Warning Zone and Static Correction Zone . Set the Boundary width as wide as possible to give your pet the widest Warning Zone and Static Correction Zone .
Test Receive collar : Make sure the Receive Collar is power on . Hold the Receive Collar at your pet’s neck level and walk toward the Boundary Wire with Contact Points pointing up until the Receive Collar beeps.
If the Receive Collar not beep at the desired range , turn the Boundary Width Control Switch Knob clockwise to increase the Boundary Width while turn it counterclockwise to decrease the Boundary Width .Repeat this activity needed until the Receive Collar beep at the desired distance from the Boundary wire .
The Receive Collar beeps as a warning tone and ticks when delivering a Static Correction . After hearing the beeps , continue to walk toward to the Boundary Wire . The Receive Collar will emit static shock with beep warning , indicating you enter Static Correction Zone .
The Receive Collar has 4 level static correction . When walk close to the Boundary Wire , the shock level will increase automatically from 1 to 4 .
A warning beep and emitting static shock indicating that the Receive Collar and the system are working properly and your ready to burying the Boundary Wire .
VI. Install the Boundary Wire :
Bury the Boundary Wire . Burying the Boundary Wire is recommending to protect it and prevent disabling the system .
.Cut a trench 1-3 inches deep along your planned boundary .
.Place the Boundary Wire into the trench maintaining some slack to allow it to expand and contract with temperature variations .
.Use a blunt tool such as a wooden paint stick to push the Boundary Wire into the trench. Be
careful not to damage the Boundary Wire .
Attach the Boundary Wire . The Boundary Wire can be attached to a chain link fence ,spilt rail fence , or a wooden privacy fence . The Boundary Wire can be attached as high as needed . Make sure the Boundary Width is set a high enough range for the pet to receive the signal .
VII. Place the Boundary Flags : The Boundary Flags are visual reminders for your pet of where the Warning Zone is located .
.Hold the Receive Collar at your pet’s neck height
.Walk towards to the Warning Zone until the Receive Collar beeps
.Place a Warning Flag in the ground .
.Walk back into the Pet Area until the beeping stops .
.Repeat this process around the Warning Zone until it is marked with Boundary Flags every
10 feet .
VIII. Fit the Receive collar: Place the collar strap in the middle of the dog’s neck. The receiver should be on the under side of his neck althoughon some dogs’ necks the receiver will naturally seek a slightly off-center position. The Rubber Cover should face backwards ( toward the dog’s chest).
Tighten the buckle by holding it with two fingers as you pull the strap snug. Receive collar must be put on a dog quite snugly to ensure consistent contact and reliable stimulation.
Do not put any fingers under the strap as you tighten it
FENCE SYSTEM TRAINING GUIDE
Be patient with your pet . Proper training your pets is essential to the success of the DF-112L Fence System .Remember that this fence system is not solid barrier . Read this section completely before beginning to train your pets .
.Have fun with your pets throughout the training process
.Train for 10 to 15 minutes at a time
.If your pets shows signs of stress , Slow down the training schedule
.Your pets must be completely comfortable near the Boundary Flag at the end of each training session. Spend at least 5 minutes of play time at the completion of each training session..
.Finish each training session on a positive note with lots of praise and play .
.Remove the Receive Collar after each training session.
.During training , Remove the Receive Collar when you need to take the pet out of Pet Area.
Please follow up these topics for detailed training.
Boundary Flags awareness : Train your pets to learn that the Boundary Flags and warning beep from the Receive Collar in the defined Pet Area .
Stay in the Pet Area: Train your pets to stay within the Pet Area . If the pets close to the Static Correction Zone , Will receive the shock stimulation .
Free walk without Receive Collar in Pet Area . If your pets learn to the Static Correction Zone and realize the resistant even you already remove the Receive Collar,. The pets will be not out of the Pet Area .
Battery Maintenance : When storing the receive collar for long periods , remember to regularly give the battery a full charge .This should be done once every 10 to 12 weeks
Charging
Rechargeable Electronic Dog fence DF-112L