
lengthen and widen wall tile spacer 1.wall tile spacer make the well -located 2.Any sizes are available support open new mold
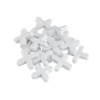
Tile spacer
1.Material :Fresh material or recylce material(as customers' requirement)
2.Type :standard type and with handle type
3.Application:Made of PE Holds tile securely in place for quick and accurate installation Precision
molded, not extruded, for strength and stability
4.Size :1.0,1.5,2.0,2.5,3.0,4.0,5.0,6.0,8.0 and 10.0mm
What you'll need;-- Tile Spacers- Tiles- Adhesive- Latex Gloves- Notch Trowel- Adhesive Spreader (Optional)- Grout Float- Hydro Cleaning Sponge- Mixing Bucket (For mixing adhesive)1.) Using a Bright Ideas Notch Trowel, apply a bed of adhesive over an approximate area equivalent to four tiles.2.) Fix the first tile squarely into position and place a 1mm tile spacer at each corner.3.) Using a twisting action position the next tile alongside the first tile and place a 1mm spacer at each of the corners.4.) Repeat points 1 to 3 for all subsequent tiles applied.5.) After all tiles have been applied to the surface, proceed to grout over all the tiles using a Bright Ideas Grout Float, making sure to leave spacers in their fixed positions.6.) Allow the grout time to set before cleaning away any excess grout with a Bright Ideas Hydro Cleaning Sponge.
With handle type
fresh material type
recycle material type
Lengthen & thicken type
lengthen wall tile spacer