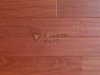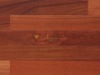

1) Cumaru engineered flooring 2) 7 time UV coating /traffert brand 3) Homag cut machine 4) CE certificate availabe 5) Carb
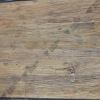
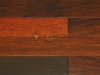
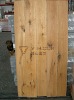
Product Name:Cumaru engineered flooring
| Speices | cumaru + poplar and other hardwood mixed plywood |
| Size | 310-1820mmx123x15/4mm |
| Average length | 700mm |
| Constuction | cumaru top layer 4mm,base material plywood 11mm |
| Grade | selected/AB |
| Joint system | T&G |
| Bevel | 0.5mm micro bevel ( can be according to clients requirement) |
| Surface effect | UV lacqured 7 times coating Traffert brand |
| Certificate | CE certificate available. Carbo certificate available |
| Moisture | 8-10% |
How to Install Engineered Flooring
Engineered flooring is not only designed to ensure less 'movment' of the floor but also to be installed easily. These days most engineered flooring on todays market has a 'click' together system, which means the boards simply lock together rather then the old tongue and groove system which had to have the joints glued with PVA glue and then clamped tightly. However some fitters and manufactures swear by the tongue and groove system so there are still many manufactures that produce engineered flooring with a 'T+G' system. The following should be used as a guide only and you should always refer to the manufactures installation methods or you could void any guarantees you may have on your flooring.
Method 1 - Installing engineered flooring on wooden sub-floors
1) Ensure the sub-floor is level, clean and dry.
2) You need to install a laminate flooring underlay over the sub-floor. You do not need to install a damp proof membrane prior to this although some people will put one down as a precaution and to protect the manufactures guarantee (see 'underlay types' page to see what underlay best suits your project).
3) Decide what direction you are going to to install your engineered flooring in. Most people will run the planks down the longer length of the room or so when you walk into the room you are looking down the planks but this is no right or wrong direction and does come down to personal preference.
4) Measure the room accross the width and then divide this figure by the width of the engineered plank. For example:-
Therefore you do not want to end up with a tiny cut at the end so it may be worth starting with a cut and the finishing with a cut so you have 2 equal cuts both sides of the room. For example if you worked it out as 29.19 planks like in the above example, then you simply need to take this amount off the first row so you will have no cuts to do at the end.
5) Typically start from the left handside of the wall and then simply 'lock' each plank into one another until you have completed the first row. Ensure you maintain an expansion gap between 10-15mm from the wall and the flooring using expansion wedges
6) Work accross the floor locking each plank in place and tapping tightly together with a tapping block and pull bar. As a rule it is always a good idea to lay the flooring like 'staggered' brick work as the overall effect will look a lot better.
For example:-
As a rule always ensure the joints in the following rows are at least 25cm apart.
For example:-
7) Once your flooring has been installed and you have maintained your 10-15mm expansion gap, ensure you remove all expansion wedges you have used overwise your new floor may lift up as there is no room for the floor to 'breathe'.
8) Conseal the expansion gap around the perimeter with either scotia beading, new skirting boards or colour mastic. Hide the expansion gaps around radiator pipes etc with radiator rosettes and any other gaps etc, use colour mastic/sealant.
9) Install any doorbars required.
REMEMBER - ALWAYS LEAVE AN EXPANSION GAP AROUND ANYTHING THE FLOORING CAN COME IN CONTACT WITH OR YOU MAY CAUSE LIFTING PROBLEMS AND GAPPING!!
Method 2 - Installing engineered flooring on concrete sub-floors
This is exactley the same as the above method for wooden sub-floors but you need to install a damp proof membrane before the underlay or use a combination underlay which works as both an underlay and a damp proofing. You need to ensure that you seal any gaps in the damp proofing with waterproof tape to prevent any moisture escaping.
cumaru multilayer engineered Wood flooring